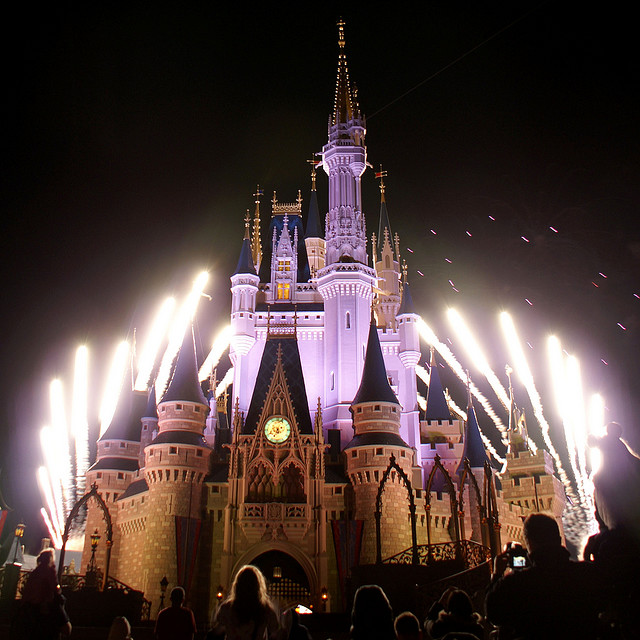
Whatever the season, fireworks have always been used to mark big events. Photographing these fireworks can be tricky but in this article are some tips to get the best
pictures possible.
Fireworks Photography Fundamental 1 — A Slow Shutter Speed.
A skyrocket takes time from the moment it's launched until the last burst of its color fades. As the rocket sails skyward, the crowd has time to exclaim "Ooh!" Then as it explodes in a burst of trails of color, the crowd has time to exclaim, "Ahh!" From launch to fadeout takes a few seconds perhaps ending with a stirring "bang." Your exposure, therefore, should be long enough to capture part, or all, of this time-consuming progression.
Shooting with a digital camera is somewhat like shooting
slide film. If you're not careful, you can overexpose and lose detail and color in the highlights. Since fireworks are, by definition, highlights, using a digital camera to capture them can be tricky.
How long should your exposures for fireworks
photos be? At least one second, sometimes two seconds, and some even longer. Shorter exposures don't always capture the full burst and longer exposures tend to produce washed-out results. For example, if you were to set your exposure for, say, 1/500th, not only will the lens be open for only a fraction of the rocket's progression, but the exposure may also be too brief to record any image at all! If you have a B (Bulb) shutter speed setting you can use it to control exactly how long your shutter is open. This is a great option. The trick is to open the shutter right at the beginning of the burst and close it when it reaches its peak. Anticipating the explosion can be difficult, but not impossible. If you don't have a B setting you can choose a fixed setting, such as 1 second.
The best way to tackle a long exposure will depend primarily on what kind of camera you're using. Let's examine how this works with different types of cameras.
DSLR Cameras
It's easy for you to select a long exposure time using a DSLR (digital single lens reflex) camera. If you're using a manual mode, you can select a long exposure time by setting the shutter for one-to-thirty seconds or by using the B (or bulb) setting. You can also use the shutter priority mode to control the shutter speed. For the bulb setting you will need a cable release.
Digital Point-and-Shoot Models
You've got to hand it to camera designers — they've dreamed up a number of exotic modes that appear on some camera models. What exactly is "party mode?" That's outside the scope of this article, but there are a few cameras which feature a "fireworks mode" that will give a long exposure. Don't worry if your camera doesn't feature a whole host of "modes." Most of them are baby steps for inexperienced photographers. If your camera has manual settings — which most digital point-and-shoot models have, just figure it out using the manual or trial-and-error going through the menus.
Fireworks Photography Fundamental 2 — Choosing the right aperture.
What aperture should you use? Your f-stop will be based on the ISO you select.
You might think that because the sky is so dark you need a wide aperture. Just the opposite is true. Remember, your objective is not to record the
dark sky except as background. You want to record the intensely bright streaks of color. Were you to use a wide open aperture during your time-exposure, you would probably overexpose the colors. Result: They would "burn out" and lose coloration. To intensify the color, therefore, use a smaller aperture like f/8, or f/11, or even f/16. As with your choice of shutter speed, you will have to set your aperture manually. Which you should use depends upon your digital camera's ISO setting (or the speed of your film), and the intensity of the color bursts. We suggest you bracket your shots, using different apertures.
Using one of the suggested apertures listed below, you can use your preview to test and then compensate the aperture accordingly.
ISO SETTING APERTURE RANGE
ISO 100 ƒ/8 to 16
ISO 200 ƒ/11 to 22
ISO 400 ƒ/16 to 22
This chart will work with most digital cameras that allow you to set shutter speed and aperture. Most of the sophisticated digital point-and-shoot models permit the photographer to set these controls. If you've never done this before, you'll have to figure out how to use these controls by looking at your camera's instruction book. If you're using a digital SLR, then try these settings too. Naturally, you'll check your results by reviewing your initial photos on your camera's LCD panel, until you get the exposure that looks best.
Fireworks Photography Fundamental 3 — Setting the ISO
Typically, noise/grain is not a problem in this type of image. We recommend that you use ISO 200, or 400. The important point is that you don't need a very fast ISO; in fact super-fast ISOs may overexpose the firework display. Very slow ISOs - for example, ISO 100 - may not be sensitive enough to capture the display. (Remember, while your shutter will be open for a second or two or more, the actual appearance of the "rockets red glare" will last only a fraction of a second in any one place.)
Since many of today's digital SLRs offer good results at high ISOs such as 800, 1600 and 3200, why not use a faster ISO? The answer is simple - you don't need to. You want a long exposure time, and as we've mentioned elsewhere, the bursts of the exploding fireworks are bright enough to etch themselves onto low ISO sensor settings such as 200 or 400, even with a medium-size aperture setting. A higher ISO would just run the risk of overexposed washed out colors. We also suggest, because of the brightness of the fireworks vs. the dark night sky, that you avoid using the "Auto ISO" setting, one that we don't use much anyway.
Fireworks Photography Fundamental 4 — A Solid Platform.
Regardless of your camera, once you've worked out the shutter speed/aperture/ISO combination, the key to success is a solid platform to hold the camera motionless during the time the shutter is open. This is pretty much a requirement for all time-exposures or shutter speeds slower than 1/30 of a second. Obviously, the best platform of all is a tripod. It provides a solid, easy-to-carry base on which to hold the camera motionless during the exposure. It also allows you to easily position the camera at the proper elevation. All DSLRs and almost all point-and-shoots have a threaded opening on the bottom that permits you to attach the camera to a tripod.
A tripod is just the beginning. You also want the camera to be as vibrationless as possible during the time-exposure. Since pressing the shutter button can cause the camera to vibrate, you can avoid this by also using a cable release. The cable release enables you to press the shutter button without touching the camera directly. Result: It helps minimize camera shake.
Advanced Hint: For the ultimate in steadiness, on some professional DSLRs you can lock the mirror in an up position. Why do this for fireworks photos? Because when you take a normal picture with an DSLR, the mirror snaps up during the moment of exposure, then snaps back so you can set up the next shot in the viewfinder. When the mirror snaps up, it causes the camera to vibrate for a moment. While this vibration is usually tiny, if you're a purist and want the steadiest possible time-exposure, you can eliminate this vibration totally by locking the mirror in its "up" position. Of course, you can't frame the next shot in the viewfinder if the mirror is locked up. But this may not be so big a problem as it seems. After all, typically, fireworks appear in only one specific segment of the sky, so once you've aimed your camera-on-tripod in that direction and framed the shooting area, you can lock the mirror up unless you have to reframe for different shots.
Back to basics:If you don't have a tripod handy (or you're using a camera that doesn't have a tripod thread), don't give up. Try placing your camera on a makeshift solid platform, such as a fence post, a railing, or a wall. None of them is as steady or convenient as a tripod, but they're infinitely better than hand-holding.
A word of warning: If, by any chance, you are on a rocking boat when trying to capture fireworks photos, your tripod or the ship's rail or whatever you use as a "platform" will rock along with the boat. Result: In your time-exposure the firework color-streaks will come out rocking and wavy instead of straight. This may be interesting modern art - though we doubt it! - but it's definitely not good firework photography. It won't look right! Our advice: If you are on a rocking boat, don't bother to photograph the fireworks. It's a waste of time.
Fireworks Photography Fundamental 5 — Composition
Which way should you hold the camera? Typically, you'll be better off with a vertical format rather than horizontal. After all, the trail of a skyrocket is usually upward and not very wide. However, a final decision about the frame you use will also depend on the size of the crowd viewing the event, your position in that crowd, and the number of spots from which the fireworks will be deployed. For example, in New York City, Macy's Department Store has sponsored the Fourth of July fireworks display. The shells are launched from a string of barges in either the East River or Hudson River that's almost a mile long. That means you might be able to fill a horizontal frame with six or more bursts at one time, so it would probably be a better choice than a vertical one.
Position yourself wisely.
Take a little time before the show to scout the location. If it's a smaller show, you may be able to chat with the pyrotechnic crew beforehand. To get the best fireworks photos with a digital camera, point-and-shoot or DSLR, try to determine where the fireworks will be launched and then try to find a clear, unobstructed view that meets your compositional requirements based on the terrain, the height at which the fireworks will explode, and your lens choices. You don't want to be in the middle of a crowd, with people wandering in front of the camera, or worse, bumping into your tripod mid-exposure. Steer clear of artificial light sources such as streetlights to avoid the possibility of light flare. Watch out for tree branches that can sneak into your composition too.
Focal Length.
What focal-length should you use? If you're close to the display, and if you have a choice, go for a "normal" or slightly wide-angle lens. Since your position relative to the rocket bursts will determine the exact focal length, use this as your guide: You want the frame of your image to extend so that it includes a good bit of the foreground in the bottom (more on this in a moment) and a "head-room" above the topmost firework trails. Chances are you'll need at least your normal and possibly a wide-angle setting for this. If, on the other hand, it's a world-class display that draws a "world-class" crowd, you may be further away from this display and need to use a longer focal length.
Foreground Subjects with Fireworks
Now, there's an additional step to consider that can take your fireworks photos out of the ordinary and make them extra-special. The burst of a skyrocket, by itself, is pretty. But it's not particularly interesting. What can you do to add interest? Try this: Don't just shoot the burst by itself, but shoot it in conjunction with something else. For example, look how much more interesting this picture is because the paths of fireworks are incidental to this picture of the Capitol Building. Since you may not have the Capitol in your area — or even its equivalent — what can you use to add similar interest?
Consider including a statue in the foreground, with the fireworks framing it. Or silhouettes of the onlookers to give a sense of location to your picture. Or a tree, a building, a bridge, a skyline. Or...you fill in the blanks. The important thing is that your image include some interesting foreground objects — perhaps, framed within the fireworks display.
Fireworks Photography Fundamental 6 — Use the highest Quality-setting.
By choosing a high Quality-setting you will reduce the amount of compression applied to your images. JPEG compression degrades image quality and can even introduce artifacts into your image. This is a particular problem for this subject matter because compression artifacts are typically found in areas of high tonal and color contrast, like the bright colored light of fireworks bursting against an inky black sky. Less compression means fewer image artifacts and ultimately better image quality. Unless you have a top-of-the-line pro DSLR, don't expect to be able to take photos of fireworks with a digital camera in RAW. Your camera will likely take too much time to write the image to the card and you'll miss getting some pictures.
Back to basics:
Whether you're advanced or not, there's one more "trick" for you to consider. Why limit yourself to just one rocket's glare? What about keeping your shutter open long enough to capture the glare of a few rockets exploding in air one after the other. To accomplish this, experiment with longer time exposures — ten seconds, 20 seconds, and even longer. You can get some dazzling results!
To sum up our fireworks
photography tips, don't let any of the complications examined in this article discourage you. Firework
photography is easy to take and make great photographs. Just remember the five Fundamentals: 1) Slow Shutter speed 2) Small aperture 3) Use a lower ISO 4) A Solid Platform 5) Composition 6) Use the highest quality setting.
While shooting, be aware that most firework displays have a rhythm that usually ends in a multiple burst of glory. If you want to limit the amount you shoot, hold back for this Grand Finale. But be wary. It may happen before you realize it...and then it's too late! So be sure you're ready for it. If the fireworks have a musical accompaniment — like Tchaikovsky's 1812 Overture — you can hear it coming. But often, you can't anticipate the Finale, so we can only admonish you to follow the Boy Scout motto — Be Prepared!
Source:
http://www.articlesbase.com/visual-art-articles/how-to-photograph-fireworks-fireworks-photography-fundamentals-4984475.html